User guide
Help for filling in surveys
With the PARTIMAP map-based survey tool you can give your opinion by using map markers in addition to the traditional questionnaire questions. The following description will help you in how to do this.
To proceed, you must accept the terms of use and the privacy policy on the landing page of the questionnaire. You can navigate between the worksheets by using the blue forward and back buttons at the bottom (). The completion of worksheets containing traditional questionnaire questions corresponds to similar interfaces. Follow the instructions and answer with text, number, or by ticking the number of checkboxes required or by entering your own answer.
All questions marked with an asterisk (*) must be answered, otherwise you cannot move on to the next worksheet or submit your answers.
If the owner of the questionnaire has allowed everyone to see statistics on the responses, then after providing your answers, the worksheet will show the results so far for those given questions. Click on the next button again to go to the next worksheet.
Browsing and rating map items
In some worksheets, you can browse through the elements drawn on the map. Click on the grey map button () in the bottom right corner of the map to switch between base maps (e.g. black and white, satellite, topographic or route backgrounds). Click on the zoom in and zoom out icon () or zoom in and out with two fingers to set the appropriate scale.
Items may have a description, which can be read by clicking on the item on the map or by clicking on the Map items drawer in the sidebar.
If the questionnaire asks you to rate elements of the map, you can do this in the sidebar's drawers.
- Rating with stars: following the instructions, you can rate the item on a scale defined by the number of stars.
- Like/dislike rating: you can give the item a positive () or negative () rating.
If the owner of the questionnaire has allowed everyone to see statistics on the responses, then after providing your answers, the worksheet will show the results so far for those given questions. Click on the next button again to go to the next page.
Mobile view
If you are completing the survey on a tablet or mobile phone, you can switch between the sidebar with questions and instructions and the map view with the hide () and unlock () buttons. Clicking on the highlighted items on the map will, after a slight delay, display the description and rating option for that item.
You can go to the next page at the bottom of the open sidebar.
Drawing on the map
Always try to be as precise as possible in the positioning of the markings. If necessary, use the scroll wheel on your mouse, the +/- keys or two fingers to zoom in on the map.
Plot point
The survey owner expects you to mark specific locations on the map.
This can be done by clicking on the white pin on a red background () next to the instructions in the sidebar. Then click on the location on the map that you want to mark according to the instructions. You can place the point by clicking once, then in the dialogue box on the right you can add a reason for the marked location.
You can save the selection by clicking Save or delete it by clicking Delete Item. You can then add another marker to the map.
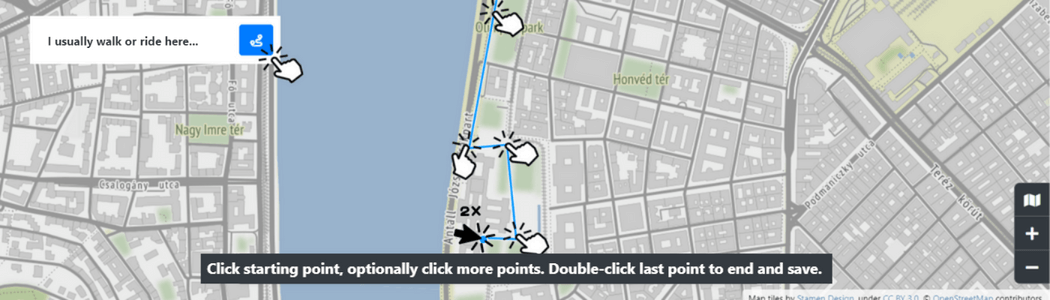
Draw a line
The survey owner expects you to mark something on the map with a line segment.
You can do this by clicking on the white line on a blue background () next to the relevant instruction in the sidebar. On the map, click once to place the start point of the line, and then click again to mark the intermediate points of the section. Finally, double-click the end point to end the line.
After closing the line, you can add a reason for the selected item in the dialogue box that opens. You can save the selection by clicking Save or delete it by clicking Delete Item. You can then add another marker to the map.
Mapping the area
The survey owner expects you to select an area that is relevant to the question asked.
This can be done by clicking on the white outline on a green background () next to the relevant instruction in the sidebar. On the map, click once to place the start point of the shape, click again to select the boundary points, and then click again on the starting point to close the area.

After closing the area, you can add a reason for the selected item in the dialogue box that opens. You can save the selection by clicking Save or delete it by clicking Delete Item. You can then add another marker to the map.
When you have finished adding elements, you can move to the next page by clicking the blue arrow at the bottom of the sidebar.